How to Use Advanced Features in Elementor
Elementor’s pro version offers advanced features to take your WordPress website to the next level. You get access to more widgets, a theme builder, a pop-up builder, and custom field capabilities.
In this section, we’ll share guides for building these extra elements that level up your page.
How to Create a Popup in Elementor
Pop-up forms help you capture email addresses from leads. Elementor makes creating these forms easier with its pop-up builder. Follow these instructions to create your own popup.
Step 1: In your WordPress dashboard, go to Templates > Popups > Add New.
Step 2: Name your template and click Create Template.
Step 3: Choose a template from the Library or create your own design.
Step 4: Click Publish, then Save and Close.
Step 5: Open a new page in Elementor (CTRL + E for PC users; Command + E for Mac users).
Step 6: Drag in a button widget.
Step 7: Under Layout, choose Link > Dynamic > Actions > Popup.
Step 8: Go to Popup > Open Popup and select the popup you created.
Step 9: Go to the live page.
Step 10: Then, click on the button and see the popup appear.
Here’s how it might look:
How to Customize WooCommerce Product Page in Elementor
WooCommerce is a popular ecommerce platform to help you build an online store for your business. Together with Elementor, you create custom product pages to boost your sales.
Before you can customize your product page, you’ll need to install and activate WooCommerce and Elementor on your WordPress dashboard. You’ll also want to add a few products to your website. You can learn about WooCommerce setup here.
After setup, you now can design your product page. Follow these steps.
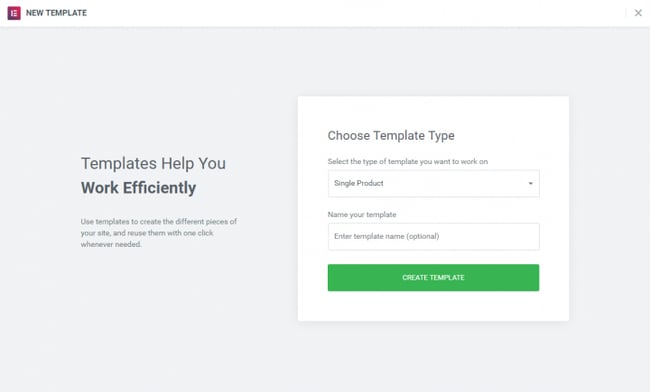
1. In your WordPress dashboard, go to Elementor > My Templates.
2. Click on the Add New button.
3. Choose Single Product as your template type and click Create Template.
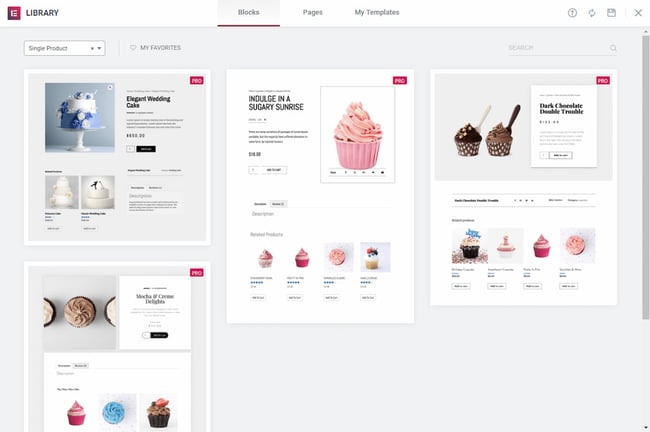
4. The Elementor Library will load.
5. Next, choose a pre-designed product page template, or build one from scratch.
6. In the template, add different product widgets to customize your page. You can find the complete list here.
7. When you’re ready to preview your page, click on the eye icon on the bottom left panel.
8. Click Settings, then choose the product you want to display.
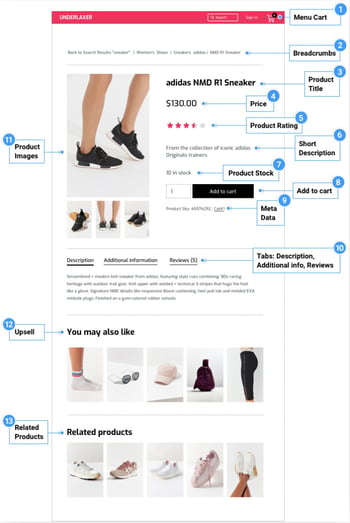
It might look like this.
9. To publish your page, click the green Publish button on the bottom left panel.
How to Create a Popup in Elementor
Pop-up forms help you capture email addresses from leads. Elementor makes creating these forms easier with its pop-up builder. Follow these instructions to create your own popup.
Step 1: In your WordPress dashboard, go to Templates > Popups > Add New.
Step 2: Name your template and click Create Template.
Step 3: Choose a template from the Library or create your own design.
Step 4: Click Publish, then Save and Close.
Step 5: Open a new page in Elementor (CTRL + E for PC users; Command + E for Mac users).
Step 6: Drag in a button widget.
Step 7: Under Layout, choose Link > Dynamic > Actions > Popup.
Step 8: Go to Popup > Open Popup and select the popup you created.
Step 9: Go to the live page.
Step 10: Then, click on the button and see the popup appear.
Here’s how it might look: